- Mar 1
- 3 min read
Updated: Apr 29

⸻
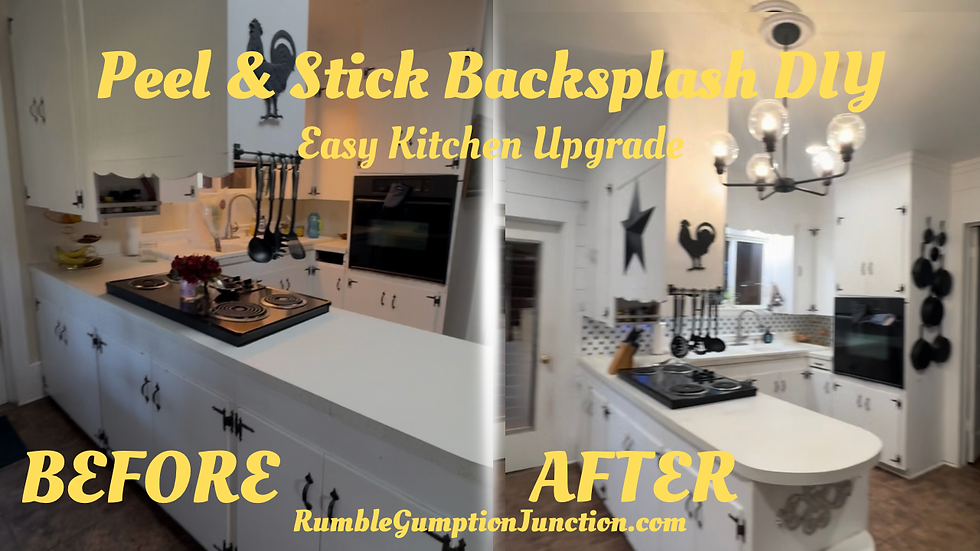
A Budget-Friendly Kitchen Refresh (No Demo Required)
This kitchen didn’t need a full renovation — it just needed an update.
Instead of tearing out the existing laminate/Formica-style backsplash, I installed peel and stick tile directly over it, added rechargeable under cabinet lighting, upgraded the outlet covers, and finished everything with trim and caulk.
No demolition.
No grout.
No contractor.
Just layering over what was already there.
⸻
What I Used:
• Peel and stick backsplash tile
• Rechargeable magnetic under cabinet lights
• Peel and stick trim
• Black outlet cover plates
• Caulk
• Box cutter
• Large cutting board
• Measuring tape
You can shop everything I used on my DIY shop page.
⸻
Step 1: Lay Out the Tile First
Before sticking anything to the wall, I laid the tile pieces out across the counter to plan spacing and cuts.
This helped me:
• Avoid awkward seams
• Plan around outlets
• Visualize the finished look
Planning first saves frustration later.
⸻
Step 2: Cutting the Tile
One of the biggest perks of peel and stick tile is how easy it is to cut.
I used a simple box cutter to trim pieces around edges and tighter spaces. No special tools required.
If you can measure and slice carefully, you can do this.
⸻
Step 3: Installing the Tile
Once everything was measured and trimmed, installation was straightforward:
Peel.
Stick.
Press firmly into place.
Working slowly and evenly helped keep everything aligned.
⸻
Step 4: Adding Under Cabinet Lighting
This might be my favorite part of the whole project.
I installed rechargeable magnetic under cabinet lights for extra warmth and visibility.
They:
• Attach easily
• Are remote controlled
• Recharge instead of hardwiring
The difference they make at night is huge.
This one small addition elevated the entire backsplash.
⸻
Step 5: Finishing with Trim
After the tile was installed, I added peel and stick trim along the edges to give everything a finished look.
Details matter.
Trim makes it look intentional instead of temporary.
⸻
Step 6: Swapping Outlet Covers
I replaced the white outlet covers with black ones to add contrast against the tile.
It’s a small upgrade, but it makes the backsplash feel more cohesive and modern.
⸻
Step 7: Sealing the Seams
To complete the project, I caulked along the seams and edges.
This step:
• Cleans up the look
• Helps protect edges
• Makes the project feel polished
Never skip the finishing touches.
⸻
Final Thoughts
This project proves you don’t always need a full renovation to change the feel of a space.
By layering:
• Texture
• Pattern
• Lighting
• Contrast
• Clean edges
The kitchen feels brighter, warmer, and more finished.
All without demo.
⸻
FAQs
Can You Install Peel and Stick Tile Over Laminate?
Yes — as long as the surface is:
• Clean
• Dry
• Smooth
• Secure
Because the old backsplash was a thin laminate-style surface, it provided a flat base for adhesion.
Clean thoroughly. Peel and Stick tile adheres well to smooth laminate surfaces as long as they are cleaned and free of grease.
Proper pressure during installation is key.
Does peel and stick backsplash hold up?
When installed properly on a clean surface and sealed at the edges, it holds up very well for everyday kitchen use.
Are rechargeable under cabinet lights worth it?
Absolutely. They’re a simple way to add warmth and functionality without wiring or electrical work.
⸻
Shop This Project
You can find the tile, lighting, trim, and outlet covers I used linked in my DIY shop page.
*Some links are affiliate links, which means I may earn a small commission at no extra cost to you.


Comments